Plan Installation
Overall process for installing a environment
Background
To understand how the process is performed, keep these concepts in mind.
Roles
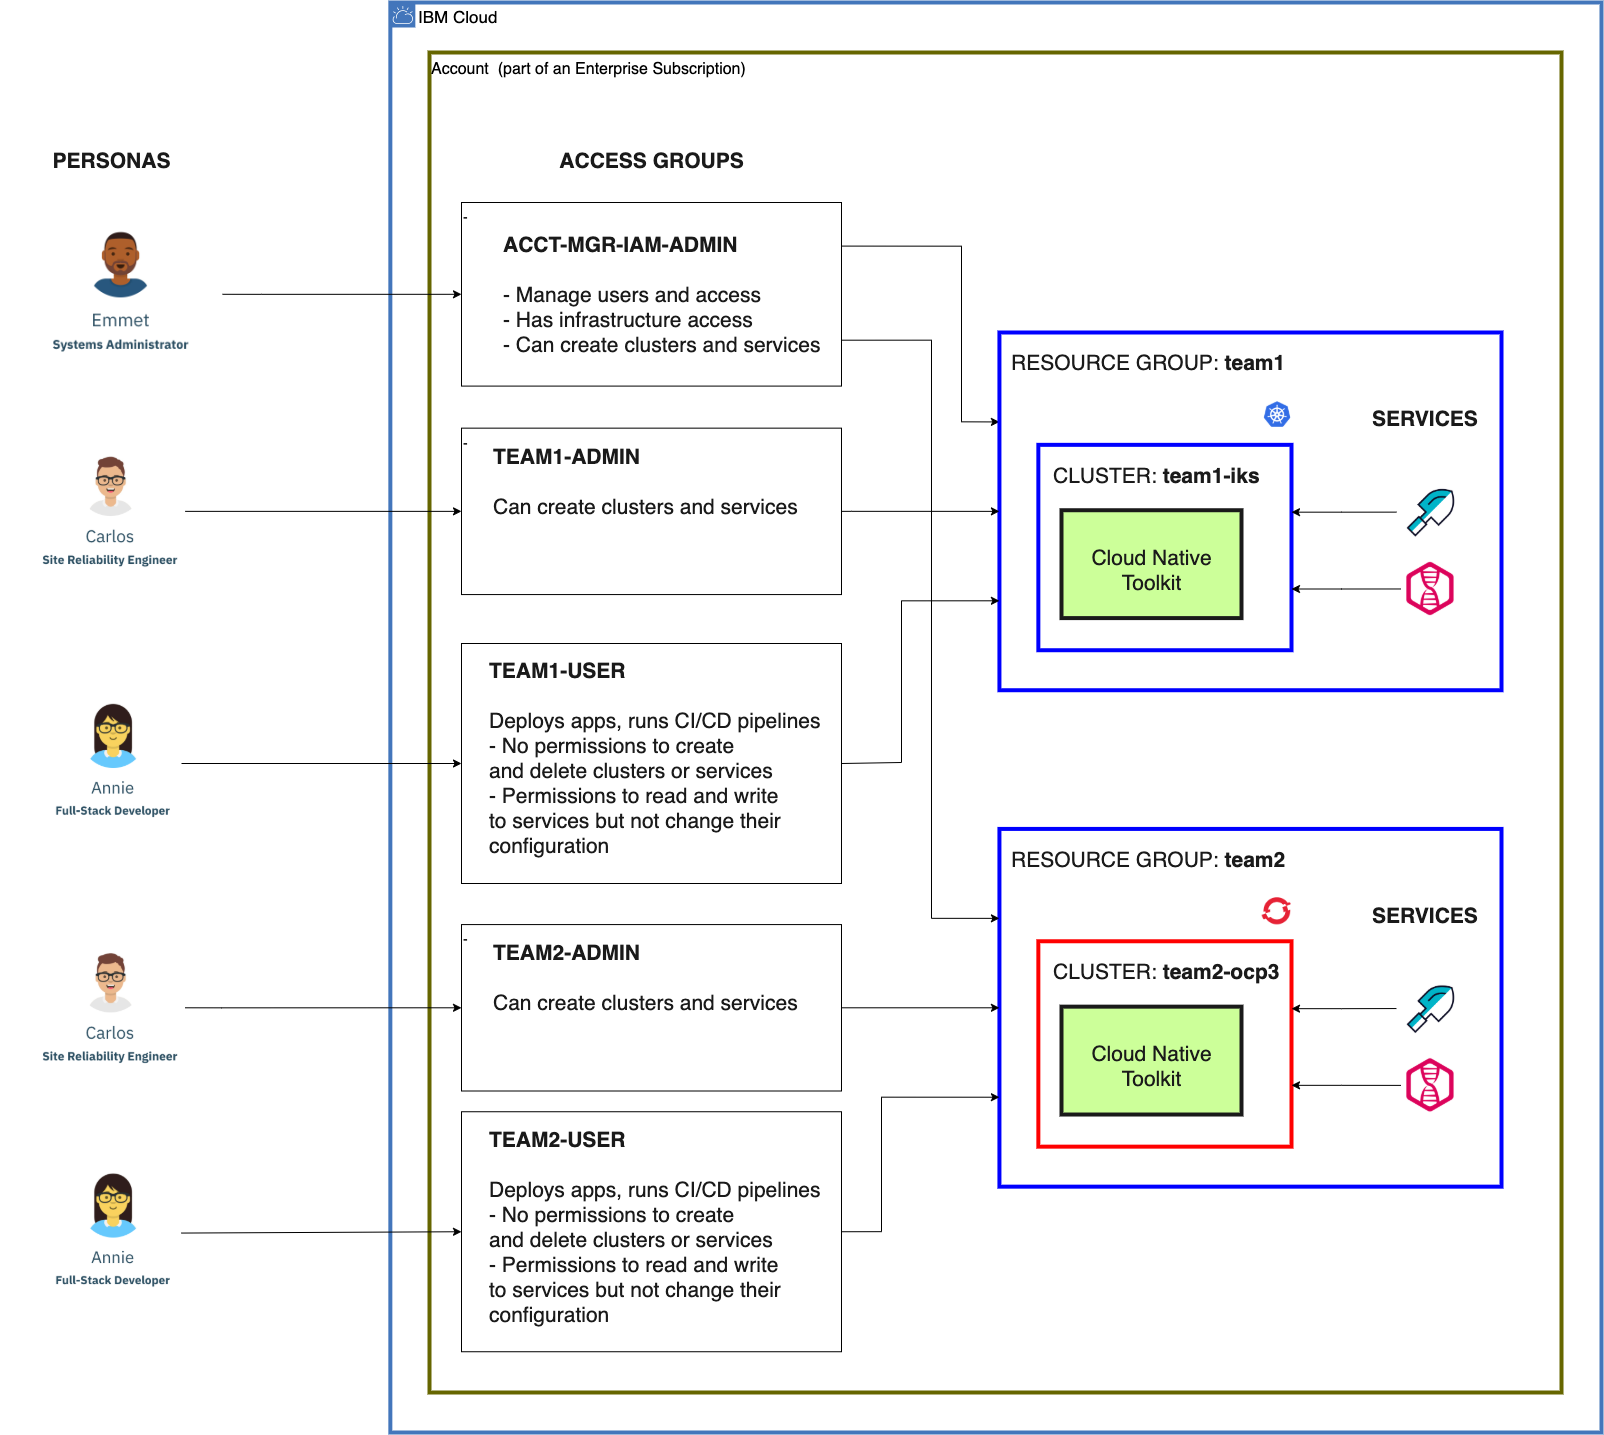
An environment is installed and used by users acting in four roles:
- Account owner: The user who owns the account
- Account managers: Account owner or other users with account management permissions
- Environment administrators: Users in the account with permissions to create services in the environment's resource group
- Environment users: Users in the account with permissions to use existing services in the environment's resource group (e.g. developers, data scientists, etc.)
The account owner must create the access group for account managers (see below). The account owner will:
- Create an
ACCT-MGR-IAM-ADMINaccess group using theacp-mgrscript - Add a functional ID, configured using the
acp-iaasscript, with API keys for the account managers
Then, as described in Configure Account, the account managers can set up the resource groups and access groups needed to install and use the environments. For each environment, the account managers will:
- Create a resource group
- Create an access group named
<resource_group>-ADMINusing the scriptacp-admin - Create an access group named
<resource_group>-USERusing the scriptacp-user
This diagram from [Resource Access Management]((../../resources/ibm-cloud/access-control.md#access-group-example){: target=_blank} shows the relationship of these access groups to a pair of development environments:
The steps below help the account owner start configuring the account in this manner.
Set up account managers
The account owner may want to delegate the responsibilities for configuring the account for all of the development teams that want environments. Those users who are delegated to will need account management permissions. An easy way to manage who has these permissions is to create an access group with those policies and add those users to the group. An account only needs one of these account manager access groups, which will be used to support all environments in the account.
In a new account, the account owner is the only user. Even after inviting other users, the account owner is initially the only user with the account management permissions needed to grant those permissions to other users. Therefore it is the account owner who must create the access group for account managers.
!!!Note: The video in Resource Access Management > Configuration Process shows how to perform the steps in this process.
Prepare to run scripts
We'll use some scripts in the steps below to help create access groups. Here, we'll download the scripts and prepare to run them. (If you want to use the console to manually configure the access groups, you can skip this step.)
Clone the Git repository with the scripts. (This repo also has the scripts for installing the environment.)
-
Clone the ibm-garage-iteration-zero Git repository to your local filesystem
git clone git@github.com:cloud-native-toolkit/ibm-garage-iteration-zero.git -
Switch to the cloned directory
cd ibm-garage-iteration-zero
The scripts need you to log into IBM Cloud first. In the terminal you'll use to run the scripts, log in to IBM Cloud.
-
Log in to the IBM Cloud CLI
ibmcloud login -a cloud.ibm.com -r <region>
Access group for account managers
The account owner must create an access group to grant the necessary permissions for managing the account. Do this by running a script, or by using the console to manually perform the steps in the script. Also, add the account manager(s) to this group.
Note
IBM Cloud has multiple account management services, in addition to IAM: Billing, License and entitlement, Support center, etc. An easy way to grant access to these individually is to create an access group for administering each: ACCT-MGR-BILLING-ADMIN, ACCT-MGR-LICENSE-ADMIN, ACCT-MGR-SUPPORT-ADMIN. The group created below only has IAM capabilities, so a good name for it is ACCT-MGR-IAM-ADMIN.
To create the access group for the account managers:
- Create a new access group, name it something like
ACCT-MGR-IAM-ADMIN(all capital letters) (or name it after your account) - Run the script
./terraform/scripts/acp-mgr.sh, which adds the necessary policies to the access group - Add the account managers to the group
The script adds policies that allow the user to:
- Create resource groups
- Invite users to the account
- Create access groups
The script also adds the same policies that an environment administrator has. But whereas an environment administrator can only manage the resources in one resource group, an account manager can manage the resources in all resource groups. This gives the account manager the ability in any resource group to:
- Create clusters
- Manage the IBM Cloud Container Registry (used as the environment's image registry)
- Create service instances
Functional ID for infrastructure permissions
Account managers need the permissions to create and manage IaaS resources required by a environment. Permissions for classic infrastructure (fka SoftLayer) cannot be added to an access group, only to a user. Rather than add these permissions to each account manager, create a functional ID and grant it the infrastructure permissions. The functional ID will own the API keys that the Kubernetes service needs to create clusters. As account managers are added to and removed from the account, the functional ID will always remain and always have the necessary infrastructure permissions.
Set up the functional ID in the account:
- Create the functional ID, sign it up for an IBM Cloud account, and invite the user to this account
- Run the script
./terraform/scripts/acp-iaas.shfor the functional ID's user, which adds the necessary permissions to the user
The script adds the classic infrastructure permissions needed to create and manage clusters:
- Create VLANs
- Create Kubernetes Service clusters (e.g. create virtual servers, storage, and networking)
- Manage Kubernetes Service clusters (e.g. add nodes)
The script also adds the IAM permissions to:
- Run the command to reset the API key that the Kubernetes service will use
By granting these infrastructure permissions to the functional ID and using it to create API keys, the account managers and environment administrators can create Kubernetes and OpenShift clusters without needing infrastructure permissions.
Next, each account manager will need to use the functional ID to reset the API key that the Kubernetes service will use. By using the functional ID, the API key will be owned by the functional ID instead of by the account manager. The account managers need a way to log in as the functional ID without all of them sharing the ID's password or a single API key. Thus each account manager needs their own API key for the functional ID's account.
Create API keys for the functional ID:
- Log into IBM Cloud as the functional ID (not as the account owner)
- Switch to this account that you're configuring
- For each account manager, create an API key, downloading each key to a file
- Give each account manager their API key file for the functional ID
Users should not share these API key files with each other. When a user is no longer an account manager, remove them from the access group and delete their API key. To make a user an account manager, add them to the access group and create an API key for them.
Process
The overall process:
- Configure account -- An account manager configures the account so that environments can be installed
- Install environment -- An environment administrator runs the Cloud-Native Toolkit scripts to create a environment
- Configure environment -- The environment administrator finishes setting up the newly installed environment
Once the environment is set up, the environment users can start using it to develop applications.
1. Configure account
First, before installing an environment, an account manager needs to configure the IBM Cloud account for the environment. See Configure Account for detailed instructions, which accomplish this:
- Upgrade the image registry
- Prepare to run scripts
- Select a region and zone
- Select a pair of public/private VLANs
- Create a resource group
- Set the Kubernetes service API key
- Create an access group for environment administrators
- Create an access group for environment users
- Optionally, create a cluster for the environment
2. Install environment
Once the account manager has configured the account for installing an environment, the account manager and the environment administrator need to jointly decide how the environment administrator is going to install the environment. There are two options:
Install including creating a new cluster: The environment administrator who performs this install needs permissions to create clusters as well as service instances. The script will run as this user to create the cluster, create the service instances, and install the CI/CD tools in the cluster.
Install into an existing cluster: The account manager creates the cluster and then grants the environment administrator access to it. The environment administrator who performs this install needs permissions to create service instances but not to create clusters. The script will run as the environment administrator to create the service instances and install the CI/CD tools in the existing cluster.
Note
A third option is to install an environment in Red Hat CodeReady Containers. For this option, you're not installing in IBM Cloud, so you don't have to configure your IBM Cloud account. However, you do have to install CRC.
3. Configure environment
After installing the environment, before giving the users access to the environment, the environment administrator needs to finish configuring it. See Configure Environment for detailed instructions, which accomplish this:
- Configure RBAC security in the cluster
- Test opening the Developer Dashboard
- Complete setup of LogDNA
- Complete setup of SysDig
- Test the pipeline by deploying a first app
- Complete setup of Artifactory
- Complete setup of Argo CD
- Rerun pipeline and confirm that the app's Helm chart is added to Artifactory
- Set up a GitOps repo to validate ArgoCD setup and configuration
Conclusion
Having configured the account, installed the environment, and configured the environment, the administrators have now completed an end-to-end installation of a environment. It is ready for a development team to begin using for application development.