Building an operator
Set up DevOps pipelines to build an operator and operator catalog
The Cloud-Native Toolkit provides Tekton pipelines to automate the process to build and deploy operator-based applications. The operator pipeline supports Ansible, Go, and Helm-based operators that have been built using the Operator SDK. The Cloud-Native Toolkit also provides a companion Tekton pipeline to build a custom Operator Lifecycle Manager catalog that simplifies deployment of the operators to a cluster.
The following steps will walk you through using the pipelines to build an operator and operator catalog and deploy them to a cluster.
Prerequisites
Operator SDK
The Tekton pipeline for building operators requires that the operator has been created by at least v1.0.0 of the Operator SDK but we recommend using the latest available (v1.3.0 at the time of this writing). The Operator SDK structure had a major architectural change with v1.0.0 and continues to have significant improvements made with each release.
If you do not have operator-sdk, follow the installation instructions to get it.
(Optional) Create your operator
These steps will walk you through building a simple operator following the Operator SDK quick-start guide. You can choose between Ansible, Go, or Helm quick start guides for the following example.
Note
If you already have an operator built with v1.0.0+ of the Operator SDK then you can skip to the next section.
The Ansible operator quick start seems to be the simplest way to get up and running quickly and exercise the Tekton pipelines. We've included the abbreviated steps from the Ansible quick start guide below.
-
Create a directory for your operator and change to that directory
mkdir memcached-operator cd memcached-operator -
Initialize the operator
operator-sdk init --plugins=ansible --domain=example.comwhere:
--pluginscan be either ansible, go, or helm. If--pluginsis not provided then it defaults to go--domainis the base domain name used for the Custom Resource Definition generated for the operator
-
Create an API for the operator
operator-sdk create api --group cache --version v1 --kind Memcached --generate-rolewhere: -
--groupis the api group for the CRD ---kindis the resource kind for the CRD ---versionis the resource version for the CRD -
Generate metadata for Operator bundle
make bundleAnswer the interactive questions
-
Create the README.md and initialize git repository
echo "# memcached operator" > README.md git init git add . git commit -m "Initial commit" -
Create a new remote git repository on a git server such as GitHub and copy the url
-
Push the local git repository to the remote GitHub repository
git remote add origin ${GIT_URL}
git push -u origin $(git rev-parse --abbrev-ref HEAD)
At this point you have enough of a functioning operator to try out the Tekton operator pipeline. If you want to explore the operator you have created and/or enhance its capabilities, there are more detailed instructions on the operator sdk page.
Register the operator pipeline
This step is similar to what you learned in the fast-start Continuous Integration section deploying an application
1. Log into your Development Cluster from the command line
Before starting, make sure you have set up your development tools.
Log into the cluster with icc [cluster name|cluster nickname]
Run oc login $SERVER -u $OCP_USERNAME -p $OCP_PASSWORD
You should now be able to access the OpenShift console:
oc console
Info
If your workshop is on Code Ready Workspaces, follow the steps in Code Ready Workspaces Setup before logging in to the cluster.
The remaining steps assume this step has already been performed. If you stop and then come back later it is a good idea to re-run this step again before proceeding
2. Create the operator development namespace
Before getting started, the development namespace/project needs to be created and prepared for the DevOps pipelines. This is something that would typically happen once at the beginning of a project when a development team is formed and assigned to the cluster.
This step copies the common secrets and configMaps that contain the CI/CD configuration from the tools namespace into the development namespace/project. This enables the pipelines to reference the values easily for your project.
oc sync ${OPERATOR_NAMESPACE}
3. Register the operator in a DevOps Pipeline
-
Start the process to create a pipeline using Tekton.
oc pipeline --tekton -
The first time a pipeline is registered in the namespace, the CLI will ask for a username and Password/Personal Access Token for the Git repository that will be stored in a secret named
git-credentials.- Username: Enter your GitHub user id
- Personal Access Token: Paste your GitHub personal access token
-
The CLI will attempt to determine the runtime of your repository. It should detect that it is an operator and prompt you to select ibm-operator pipeline or ibm-operator-catalog pipeline. Select ibm-operator pipeline.
-
When registering a Tekton pipeline, the CLI also reads the available parameters from the pipeline and generates prompts for input. In this case, the option of scanning the built image for vulnerabilities is the only options. The scan is performed by the Vulnerability Advisor if you are using IBM Image Registry or by Trivy if another image registry is used. This scan is performed in "scan" stage of pipeline after "img-release" stage.
? scan-image: Enable the pipeline to scan the image for vulnerabilities?(Y/n) -
To skip the scan, you have type "n" (No). Otherwise, type "y" (Yes) for performing Vulnerability Scanning on the image.
-
After the pipeline has been created,the command will set up a webhook from the Git host to the pipeline event listener.
Note
if the webhook registration step fails, it is likely because the Git credentials are incorrect or do not have enough permission in the repository.
-
When the command is completed it will present options for next steps. You can use the Tekton cli commands to inspect the pipeline run that has been created and tail the log and/or navigate to the provided url to see the pipeline running from the OpenShift console.
4. View your application pipeline
-
Open the OpenShift Web Console
oc console
OR
-
From menu on the left switch to the Developer mode
-
Select dev project that was used for the application pipeline registration
-
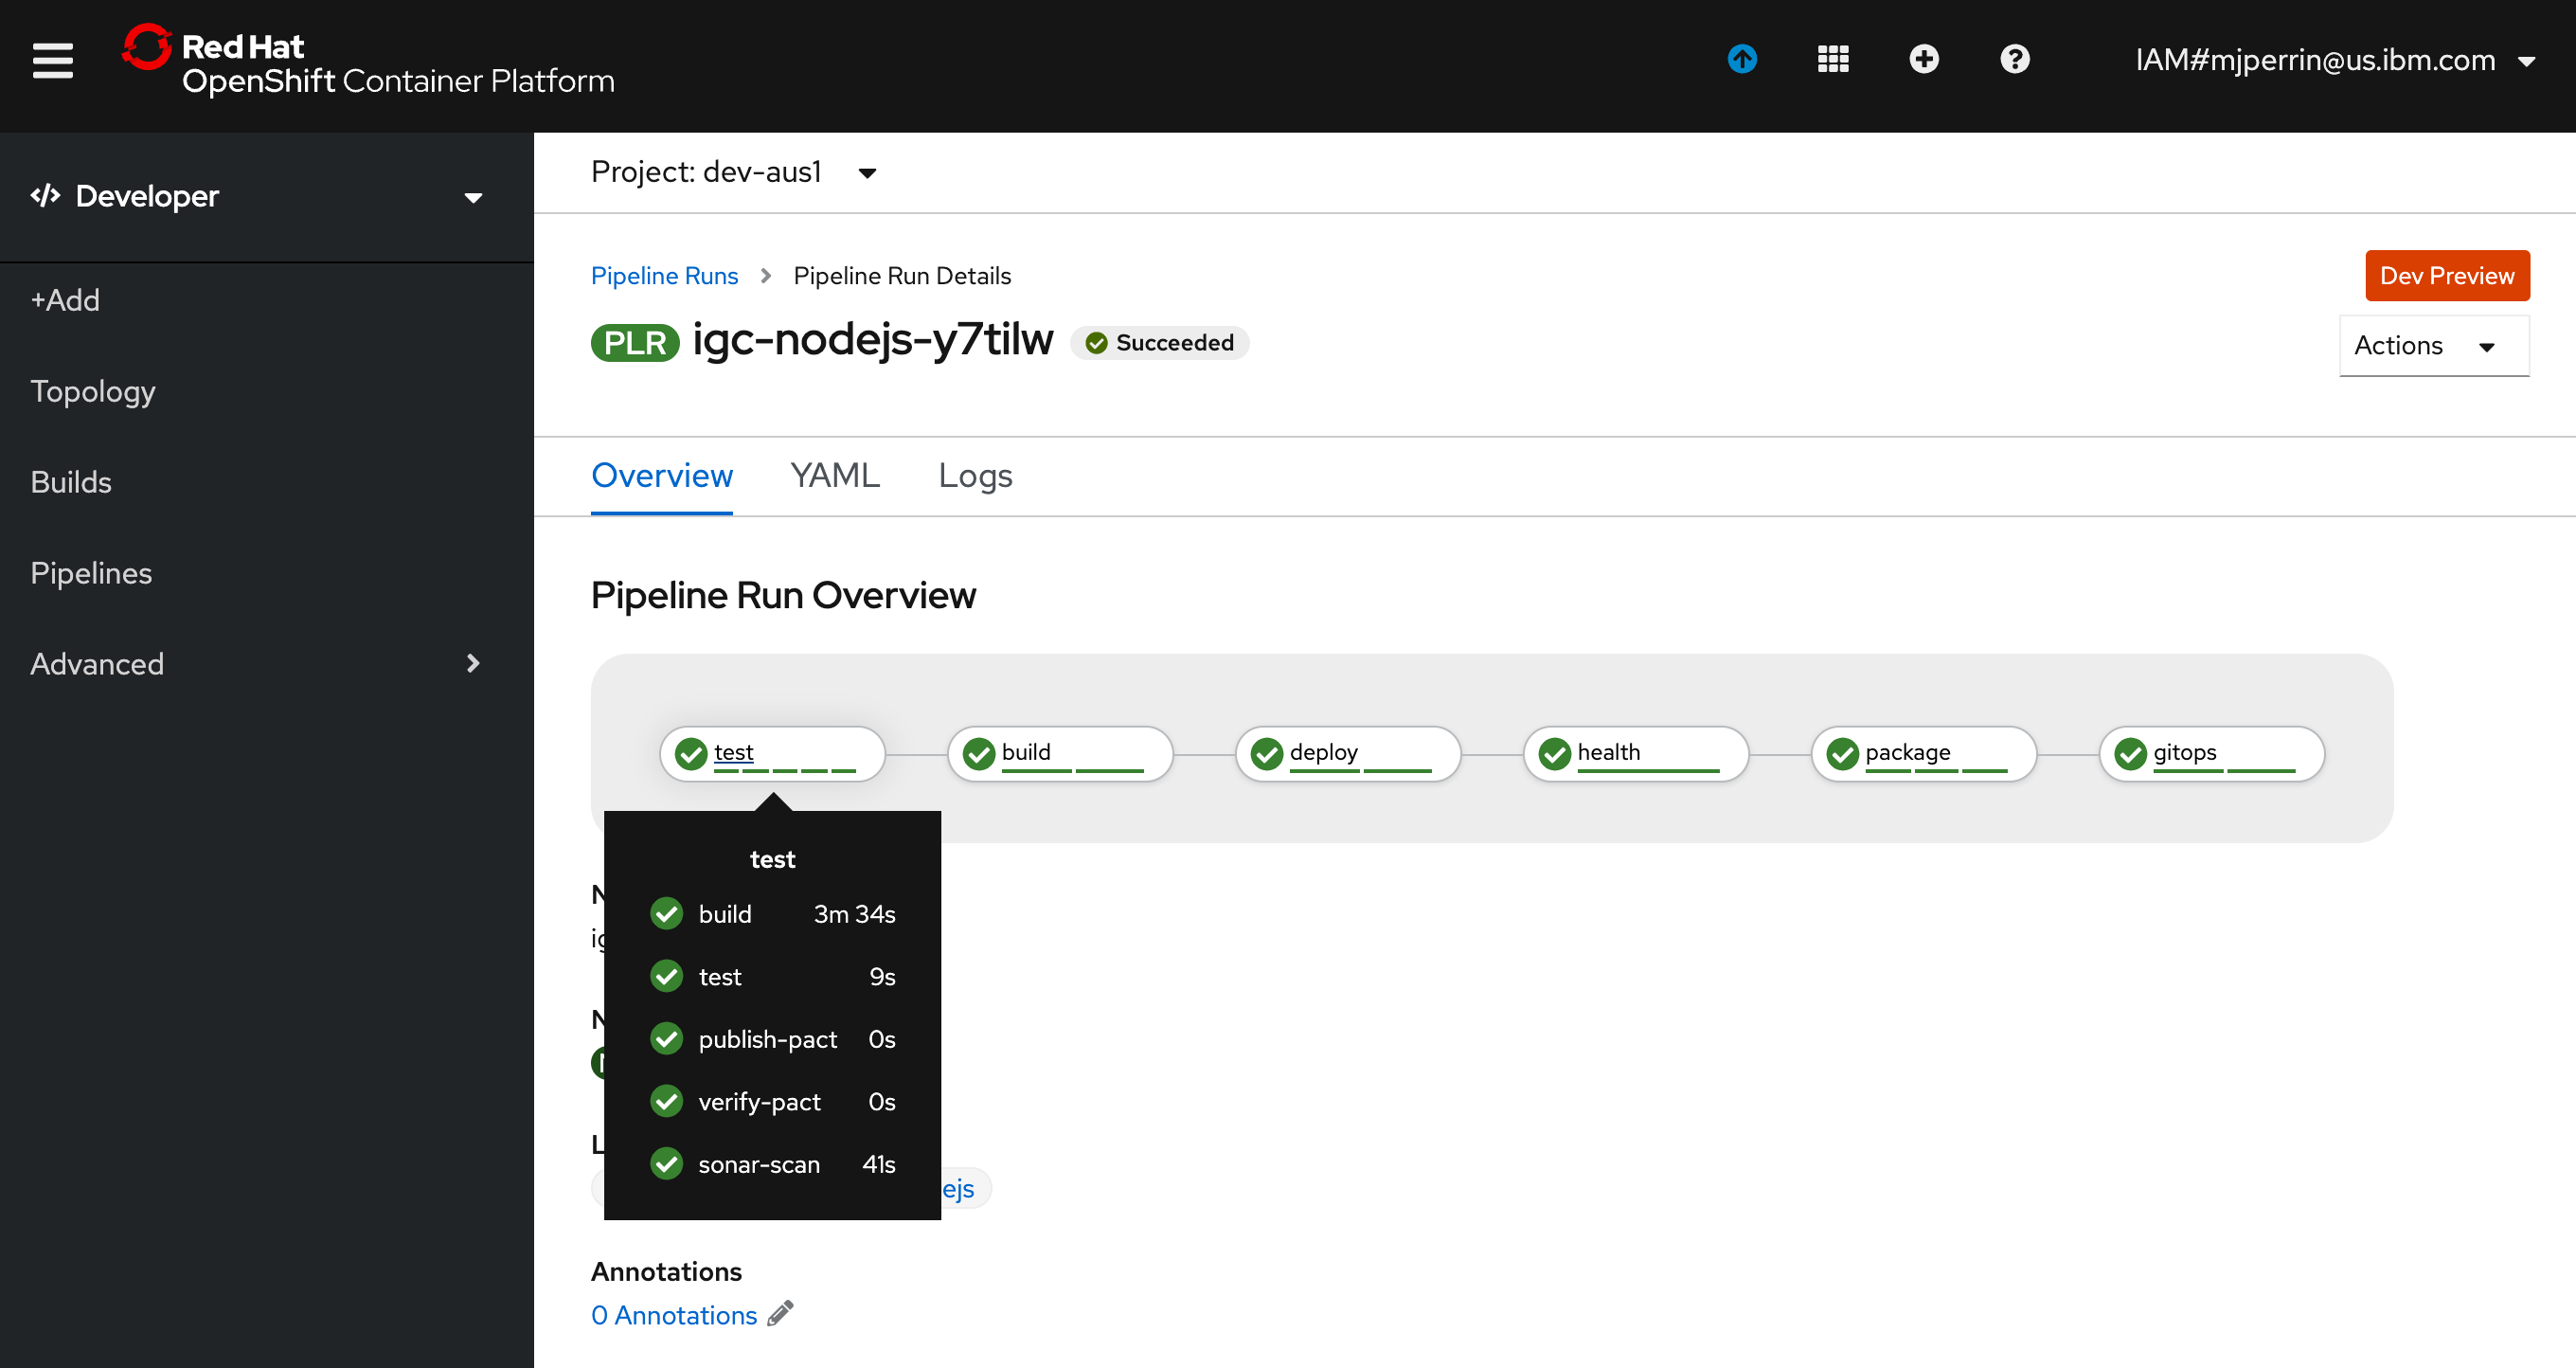
In the left menu, select Pipelines
You will see your application DevOps pipeline now starting to build and once completed will look like the image below.
Register the operator catalog pipeline
The operator catalog repository is a simple repo used to keep track of the operator bundles that will be packaged together in the catalog. Even though you may start with one operator, it is assumed that ultimately multiple operators will be managed together in one catalog.
-
Open the operator catalog template repository and create a repository for the operator catalog using the template
-
Copy the repository url
-
Create/connect to the project for the operator development. This does not need to be the same one used for the operator build.
oc sync ${OPERATOR_NAMESPACE} -
Register the pipeline for the operator catalog
oc pipeline --tekton ${GIT_URL}
Register the catalog repository with the operator pipeline
The last step of the operator pipeline will update the operator catalog repository with the new version of the operator bundle that was created. This update will trigger the creation of a new version of the catalog.
-
Change to the project where the operator pipeline was registered
oc project ${OPERATOR_NAMESPACE} -
Change the directory to the local clone of your operator catalog repository
-
Register the url for the operator catalog repository for the operator pipeline
igc git-secret olm-catalog-repo -
Kick off the operator pipeline again to update the operator catalog repo
Configure the GitOps repo
-
If you don't already have one, create a GitOps repo from the gitops template template
-
Clone the GitOps repo to the local machine
git clone ${GIT_URL} -
Change the directory to the cloned GitOps repo
-
Change to the project where the operator catalog pipeline was registered
oc project ${OPERATOR_NAMESPACE} -
Register the GitOps repo url
oc gitops -
Trigger the operator catalog pipeline build to register the catalog source in the GitOps repo
-
Configure ArgoCD to deploy the CatalogSource into the namespace openshift-marketplace